Thursday, August 31, 2006

Bramble Crumble (also Apple Crumble)


I make this every autumn when the berries are ripe. I always add apples into the Bramble Crumble. It stretches out the berries if you don't have many because the pickers have been eating them and the apples hold their shape better. My youngest boy, George's favourite desert in all the world is Apple Crumble.

Preheat your oven to 350 F or about 200 C


Crumble topping:
120 g plain flour
pinch of salt
90 g butter
3 big tablespoons of light brown (muscovado) sugar
3 tablespoons white sugar


If you are making Apple Crumble on its own, I often add cinnamon and a bit of porridge oats into the crumble mixture and a dash of cinnamon into the fruit too.

Put all the ingredients into a bowl and with the tips of your fingers rub it all in together until you have the consistency of porridge oats (dried oatmeal)


Place your blackberries (brambles) and two apples that have been peeled and sliced into a casserole dish. For Apple Crumble, just put peeled and sliced apples into the dish. I sometimes sprinkle a bit of flour onto the fruit and toss it around a bit to coat the fruit just so that the flour will absorb some of the liquid and prevent the crumble from getting too soupy.

You know the size of your own casserole dish and you'll know when you've layered enough fruit into the bottom of it.

Sprinkle the crumble topping on the top of the fruit and pop it in the oven.

Bake it until the top is toasty brown and the fruit juices are bubbling up in a couple of places.

Remove it from the oven and LET IT COOL for a little while before serving. If you serve this straight from the oven, you'll burn yourself and possibly anybody else who eats it at this temperature.

It is wonderful served with custard or cream or ice cream.

George doesn't like his crumble "messed with" - he eats it on its own.

Tuesday, August 15, 2006

Naan Bread

Because we live in the deep dark Scottish countryside, fresh naan bread is not available unless we visit a restaurant. I decided to try my hand at making them one year. Pleased with the results, I ended up making them for years.

This recipe from Madhur Jaffrery's Eastern Vegetarian Cooking. The recipe is modified for domestic ovens so that you don't feel the need to buy a clay tandoor. The recipe calls for a great deal of plain yoghurt. Conveniently, I have a coal fired range in my house. It was discovered that if the door to the oven portion of this range was left open, the temperature inside was perfect for the making of yoghurt. This means that I only ever have to buy a small amount of yoghurt as starter and make the pint of yoghurt needed here at home.

A different recipe that doesn't require any yoghurt can be found HERE.
1lb/450g plain white flour
1tsp baking powder
1/4 tsp salt
about 15 fl oz plain yoghurt
unsalted butter (optional)

Sift the flour, baking powder and salt into a bowl. Slowly add as much yoghurt as you need to gather the flour together and make a soft dough. Knead for 10 minutes and form a ball. Put the ball in a bowl and cover the bowl with a damp cloth. Set this aside in a warm place for 1 1/2 to 2 hours. Knead the dough again and divide into nine equal parts. Keep these covered util you are ready to bake them.

Heat a cast iron frying pan or griddle over a lowish flame.

Pre-heat the grill

Take one of the parts of dough and make a ball out of it. Flatten it and then roll it out on a lightly floured surface until it is about 1/4 inch thick.

When the frying pan or griddle is hot, slap the naan onto the frying pan. Let it cook for a few minutes. It will puff up a bit, sometimes it will puff up completely. Now place the whole frying pan or griddle under the grill to cook the top half of the naan. This was always the part that my children loved and where the bread got the nick name "puff-a-puff" bread. The bread will puff as it cooks. You will know it is finished because reddish spots will have appeared on the surface of your naan. Remove the naan with a spatula and brush with butter if you like. Make all your naans this way, keeping them stacked and covered with a clean cloth.

Bacon Lettuce and Tomato Sandwich (on white toast)

This is my all time favourite sandwich.

Start with white toast. I make the toast first and let it cool. If the toast is warm, the mayonnaise will melt. I don't want my mayonnaise melted too much. 
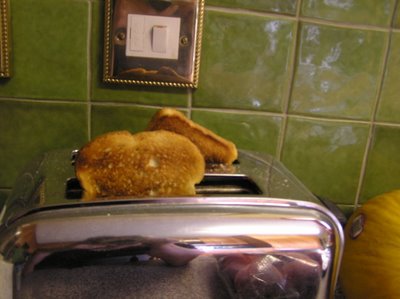
After the bread has been put in the toaster, I get that bacon frying.
Mmmm bacon! (said in a Homer Simpson style)
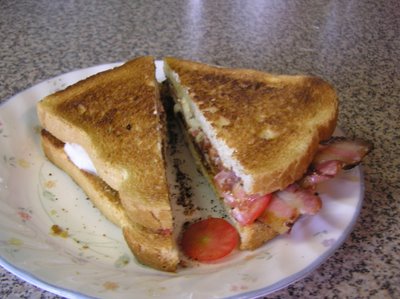
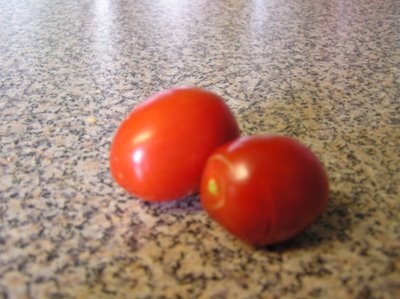
Slice those tomatoes. I am using tomatoes that have been plucked straight from the vine in my own greenhouse. Home grown tomatoes are the best! I seem to only make this sandwich when the tomatoes have ripened in the garden. The pink tennis balls on offer in supermarkets in the winter have no appeal. I'll wait until late summer thank you very much.

Now you may think this is strange but I really don't like tomatoes very much. I will never eat one raw. I won't eat the cherry tomatoes and tomato wedges that haunt salads. I think it's a texture thing. However, sliced thinly in sandwiches, they're okay and in the case of this particular sandwich, essential.

Spread mayonnaise on the toast and add the tomato slices, lettuce and crispy bacon strips. Put the top on the sandwich and cut it.

Man! You just can't beat that sandwich!
(You may notice the lack of lettuce in these photographs. It's raining outside and I don't want to go into the garden to get the lettuce because I'll get wet.)