
If you have come to my little blog searching for a recipe, would you be so kind as to let me know if you tried one of my recipes? How did it work for you?
Are you one of the people who has come here looking for an answer to a question about recipes? e.g. Why my apple crumble is always runny
Were any of my recipes what you were searching for?
If you have a question, just ask it in the comments section or e-mail me. I'll always answer questions.
The recipes that I have put up here are ones that are firm family favourites and I make them all the time. I hope they they become your favourites too.
Friday, November 17, 2006
Monday, November 13, 2006
Banana Bread
Banana bread is really a quick and easy thing to make.
I usually make this when a couple of bananas get too ripe to eat. Those bananas have the strongest banana flavour and I don't have to throw them out. I can't seem to bring myself to throw out a banana. I can throw out rotten apples and oranges, but bananas . . . . they must be put into banana bread.
Pre-heat your oven to 350 F or 180 C
Grease and flour a loaf tin (approximately 8 x4 x2)
1 1/2 cups plain or all purpose flour
1 1/2 teaspoons baking powder
1/4 teaspoon baking soda or bicarbonate of soda
1/4 teaspoon cinnamon
pinch of salt
1 egg
1 cup mashed banana (about 3 medium sized bananas)]
1/2 cup sugar
1/4 cup cooking oil
1/2 cup chopped nuts (optional) I love to add chopped pecans as they're my favourite nut
Mix the flour, baking powder, baking soda, salt and cinnamon in a medium bowl. Form a well in the centre of the dry ingredients.
In a separate bowl mix the remainder of the ingredients together. Add the wet ingredients to the dry ingredients all at once.
Mix the batter together and then fold in the nuts. It is perfectly okay for the batter to be lumpy. Pour or spoon all the batter into your prepared loaf tin and pop it into the pre-heated oven. Bake for about 50 - 55 minutes or until an inserted toothpick comes out clean.
Sometimes the banana bread will have a huge crack on the top, I keep an eye on this crack and can tell when the banana bread is done by looking at the crack.
With such a dense batter and the shape of a loaf tin, it is very easy to under cook banana bread. Its better to have it a bit overdone on the surface than to have some uncooked batter in the middle. It makes for an unpleasant slicing experience. If your oven runs a bit hot, turn it down and cook this a bit more slowly.
Sunday, November 12, 2006
Pumpkin Bars

This has been a favourite of my family for years. I've been making them since the 80's when I discovered them on a visit to my dear Aunt Joyce in Clear Lake, Iowa. She had a tray of them in the kitchen and was trying to keep my three cousins from pinching them. I pestered her for the recipe and they've been an autumn treat in my house ever since.
Here in the UK, canned or tinned pumpkin is not readily available so we have make our own pumpkin puree.
Here in the UK, canned or tinned pumpkin is not readily available so we have make our own pumpkin puree.
 Pumpkin to be used next to an orange so you can see how big the pumpkins should be.
This is what you have to do: Choose a small pumpkin about 7 inches in diameter. Cut it in half and scoop out the seeds and guts. Place the pumpkin halves on a baking tray, cut side down, and place in a moderate (180 C or 350 F) until it is baked. The skin will have started to go brown and it will be soft when you poke it. My oven takes about 35 minutes. You will find that your kitchen will be filled with that glorious warm smell of baking pumpkin that just screams out domestic tranquility and harmony. I defy anybody to pick a fight in a kitchen that smells of baking pumpkin!  Mmm - baked pumpkin!
You can use a larger pumpkin, but I find that aside from being good for carving, they're not that hot for culinary uses. They're too watery. If you do use a larger pumpkin, you simply will have to drain the water from the baking tray from time to time as you are baking.
Scrape the flesh of the pumpkin into a food processor and discard the shell. Whizz the pumpkin flesh in the food processor until it is all smooth and lump free.
Now on to the rest of the recipe.
In a large bowl put in:
2 cups of plain or all purpose flour
1 cup of white sugar
2 teaspoons of baking powder
2 teaspoons of ground cinnamon
1 teaspoon baking soda (bicarbonate of soda)
1/4 teaspoon salt
1/4 teaspoon ground cloves
Mix the dry ingredients. Then make a well in the centre of the dry mixture and add in:
4 beaten eggs
1 16-ounce can of pumpkin OR
the pumpkin puree you've just made * I weighed my last batch of pumpkin puree and it came to 4oo grams or 13 British ounces *
1 cup cooking oil (use corn oil - olive oil makes it taste odd)
Beat this until it is smooth and lump free. I use my trusty electric beater for this. Beating it by hand takes ages.
At this point, I usually carry the bowl of orange pumpkin bar batter around the house for everybody to have a sniff because it smells so great!
Pour the batter into an ungreased 15 x 10 x 1 inch baking pan and pop it into your oven (350 F or 180 C).
Bake for about 30 minutes. Remove when the top has become slightly browned. I usually pull it out when I think it is done and give it a light touch on the top. If it feels firm, then it is done. If it is still a little mushy underneath, pop it right back in for another 10 minutes.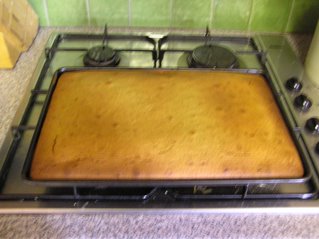 Look! This is done to perfection! Shame you can't smell it!
When the bars are finished, pull the tray out and let it cool for about 2 hours.
Then you can frost it with Cream Cheese icing!
------------------------
Cream Cheese Icing
Blend together in a bowl:
6 ounces of cream cheese
1/2 cup of softened butter or margarine
2 teaspoons vanilla extract
Sift in:
2 cups of powdered or confectioners sugar
Gradually beat in additional powdered sugar (another 1 or 2 cups) until it reaches a spreading consistency.
Spread the icing on the uncut pumpkin bars and then slice them up. They'll lift out of the pan like a dream.
---------------------------
Applesauce Bars or Applebutter Bars
Use the above recipe but substitute a 16 oz jar of applesauce for the pumpkin and don't frost them as they'll be sweet enough.
You can also try making it with a jar of Apple butter and omitting the spices in the dry mix (see recipe below)! Those are fantastic!!
 Mmm - baked pumpkin!
You can use a larger pumpkin, but I find that aside from being good for carving, they're not that hot for culinary uses. They're too watery. If you do use a larger pumpkin, you simply will have to drain the water from the baking tray from time to time as you are baking.
Scrape the flesh of the pumpkin into a food processor and discard the shell. Whizz the pumpkin flesh in the food processor until it is all smooth and lump free.
Now on to the rest of the recipe.
In a large bowl put in:
2 cups of plain or all purpose flour
1 cup of white sugar
2 teaspoons of baking powder
2 teaspoons of ground cinnamon
1 teaspoon baking soda (bicarbonate of soda)
1/4 teaspoon salt
1/4 teaspoon ground cloves
Mix the dry ingredients. Then make a well in the centre of the dry mixture and add in:
4 beaten eggs
1 16-ounce can of pumpkin OR
the pumpkin puree you've just made * I weighed my last batch of pumpkin puree and it came to 4oo grams or 13 British ounces *
1 cup cooking oil (use corn oil - olive oil makes it taste odd)
Beat this until it is smooth and lump free. I use my trusty electric beater for this. Beating it by hand takes ages.
At this point, I usually carry the bowl of orange pumpkin bar batter around the house for everybody to have a sniff because it smells so great!
Pour the batter into an ungreased 15 x 10 x 1 inch baking pan and pop it into your oven (350 F or 180 C).
Bake for about 30 minutes. Remove when the top has become slightly browned. I usually pull it out when I think it is done and give it a light touch on the top. If it feels firm, then it is done. If it is still a little mushy underneath, pop it right back in for another 10 minutes.
 Look! This is done to perfection! Shame you can't smell it!
When the bars are finished, pull the tray out and let it cool for about 2 hours.
Then you can frost it with Cream Cheese icing!
------------------------
Cream Cheese Icing
Blend together in a bowl:
6 ounces of cream cheese
1/2 cup of softened butter or margarine
2 teaspoons vanilla extract
Sift in:
2 cups of powdered or confectioners sugar
Gradually beat in additional powdered sugar (another 1 or 2 cups) until it reaches a spreading consistency.
Spread the icing on the uncut pumpkin bars and then slice them up. They'll lift out of the pan like a dream.
---------------------------
Applesauce Bars or Applebutter Bars
Use the above recipe but substitute a 16 oz jar of applesauce for the pumpkin and don't frost them as they'll be sweet enough.
You can also try making it with a jar of Apple butter and omitting the spices in the dry mix (see recipe below)! Those are fantastic!!
Tuesday, September 26, 2006
Apple Butter

It isn't available over here in the UK, so I had to start making it.
The recipe I use is from my very battered Joy of Cooking cookbook.
For best results use Jonathan, Winesap, Wealthy or other well-flavoured cooking varieties.
I use Bramley as it is the most common cooking apple in the UK.
Wash peel and remove the cores of 2 kilos of apples.
Cook slowly until soft in 2 cups apple juice or cider vinegar.
Add to the pulp brown sugar.
3 teaspoon cinnamon
1 1/2 teaspoon ground cloves
1/2 teaspoon allspice
the zest and juice of 2 lemon
Cook the fruit butter over low heat, stirring constantly until the sugar is dissolved. Continue to cook, stirring frequently, until mixture sheets from a spoon. Pour into hot sterilized jars.
----------------
If you have more apples to cook down, then naturally you will have to add more spices and sugar to taste.
Thursday, August 31, 2006
Bramble Crumble (also Apple Crumble)

I make this every autumn when the berries are ripe. I always add apples into the Bramble Crumble. It stretches out the berries if you don't have many because the pickers have been eating them and the apples hold their shape better. My youngest boy, George's favourite desert in all the world is Apple Crumble.
Preheat your oven to 350 F or about 200 C
Crumble topping:
120 g plain flour
pinch of salt
90 g butter
3 big tablespoons of light brown (muscovado) sugar
3 tablespoons white sugar
If you are making Apple Crumble on its own, I often add cinnamon and a bit of porridge oats into the crumble mixture and a dash of cinnamon into the fruit too.
Put all the ingredients into a bowl and with the tips of your fingers rub it all in together until you have the consistency of porridge oats (dried oatmeal)
Place your blackberries (brambles) and two apples that have been peeled and sliced into a casserole dish. For Apple Crumble, just put peeled and sliced apples into the dish. I sometimes sprinkle a bit of flour onto the fruit and toss it around a bit to coat the fruit just so that the flour will absorb some of the liquid and prevent the crumble from getting too soupy.
You know the size of your own casserole dish and you'll know when you've layered enough fruit into the bottom of it.
Sprinkle the crumble topping on the top of the fruit and pop it in the oven.
Bake it until the top is toasty brown and the fruit juices are bubbling up in a couple of places.
Remove it from the oven and LET IT COOL for a little while before serving. If you serve this straight from the oven, you'll burn yourself and possibly anybody else who eats it at this temperature.
It is wonderful served with custard or cream or ice cream.
George doesn't like his crumble "messed with" - he eats it on its own.
Tuesday, August 15, 2006
Naan Bread
 Because we live in the deep dark Scottish countryside, fresh naan bread is not available unless we visit a restaurant. I decided to try my hand at making them one year. Pleased with the results, I ended up making them for years.
This recipe from Madhur Jaffrery's Eastern Vegetarian Cooking. The recipe is modified for domestic ovens so that you don't feel the need to buy a clay tandoor. The recipe calls for a great deal of plain yoghurt. Conveniently, I have a coal fired range in my house. It was discovered that if the door to the oven portion of this range was left open, the temperature inside was perfect for the making of yoghurt. This means that I only ever have to buy a small amount of yoghurt as starter and make the pint of yoghurt needed here at home.
A different recipe that doesn't require any yoghurt can be found HERE.
1lb/450g plain white flour
1tsp baking powder
1/4 tsp salt
about 15 fl oz plain yoghurt
unsalted butter (optional)
Sift the flour, baking powder and salt into a bowl. Slowly add as much yoghurt as you need to gather the flour together and make a soft dough. Knead for 10 minutes and form a ball. Put the ball in a bowl and cover the bowl with a damp cloth. Set this aside in a warm place for 1 1/2 to 2 hours. Knead the dough again and divide into nine equal parts. Keep these covered util you are ready to bake them.
Heat a cast iron frying pan or griddle over a lowish flame.
Pre-heat the grill
Take one of the parts of dough and make a ball out of it. Flatten it and then roll it out on a lightly floured surface until it is about 1/4 inch thick.
When the frying pan or griddle is hot, slap the naan onto the frying pan. Let it cook for a few minutes. It will puff up a bit, sometimes it will puff up completely. Now place the whole frying pan or griddle under the grill to cook the top half of the naan. This was always the part that my children loved and where the bread got the nick name "puff-a-puff" bread. The bread will puff as it cooks. You will know it is finished because reddish spots will have appeared on the surface of your naan. Remove the naan with a spatula and brush with butter if you like. Make all your naans this way, keeping them stacked and covered with a clean cloth.
Bacon Lettuce and Tomato Sandwich (on white toast)
This is my all time favourite sandwich.
Start with white toast. I make the toast first and let it cool. If the toast is warm, the mayonnaise will melt. I don't want my mayonnaise melted too much.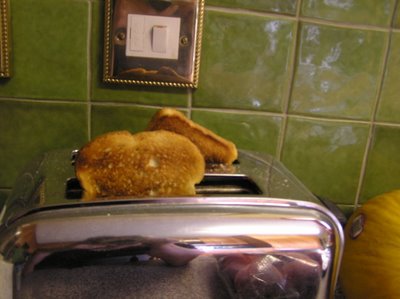 After the bread has been put in the toaster, I get that bacon frying.
 Mmmm bacon! (said in a Homer Simpson style)
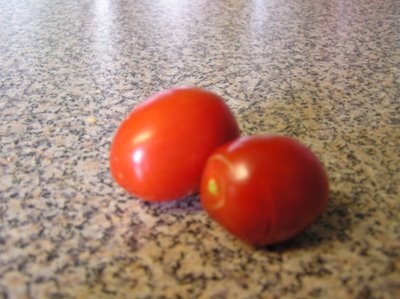 Slice those tomatoes. I am using tomatoes that have been plucked straight from the vine in my own greenhouse. Home grown tomatoes are the best! I seem to only make this sandwich when the tomatoes have ripened in the garden. The pink tennis balls on offer in supermarkets in the winter have no appeal. I'll wait until late summer thank you very much.
Now you may think this is strange but I really don't like tomatoes very much. I will never eat one raw. I won't eat the cherry tomatoes and tomato wedges that haunt salads. I think it's a texture thing. However, sliced thinly in sandwiches, they're okay and in the case of this particular sandwich, essential.
Spread mayonnaise on the toast and add the tomato slices, lettuce and crispy bacon strips. Put the top on the sandwich and cut it.
Man! You just can't beat that sandwich!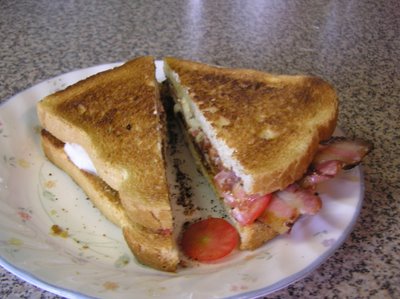
(You may notice the lack of lettuce in these photographs. It's raining outside and I don't want to go into the garden to get the lettuce because I'll get wet.)
Start with white toast. I make the toast first and let it cool. If the toast is warm, the mayonnaise will melt. I don't want my mayonnaise melted too much.
 After the bread has been put in the toaster, I get that bacon frying.
 Mmmm bacon! (said in a Homer Simpson style)
 Slice those tomatoes. I am using tomatoes that have been plucked straight from the vine in my own greenhouse. Home grown tomatoes are the best! I seem to only make this sandwich when the tomatoes have ripened in the garden. The pink tennis balls on offer in supermarkets in the winter have no appeal. I'll wait until late summer thank you very much.
Now you may think this is strange but I really don't like tomatoes very much. I will never eat one raw. I won't eat the cherry tomatoes and tomato wedges that haunt salads. I think it's a texture thing. However, sliced thinly in sandwiches, they're okay and in the case of this particular sandwich, essential.
Spread mayonnaise on the toast and add the tomato slices, lettuce and crispy bacon strips. Put the top on the sandwich and cut it.
Man! You just can't beat that sandwich!

(You may notice the lack of lettuce in these photographs. It's raining outside and I don't want to go into the garden to get the lettuce because I'll get wet.)
Saturday, May 06, 2006
Chocolate and Raspberry Pavlova
If there is one celebrity chef that I would like to know on a personal basis. Nigella Lawson. She can do no wrong. I have all her cookbooks. Any recipe that I follow from her cookbooks always work. Her Nigella Bites cookbook is getting almost as shopworn as my copy of Joy of Cooking and the dearly loved Better Homes and Gardens cookbook (my second ring - bound copy, a gift from my mother as my first copy just fell apart) The following recipe is from her Forever Summer cookbook. It is by far and away my favourite summer desert recipe.
I will only make it when the raspberries are in season. I got some raspberries this week that seem to be okay even though it is still a bit early. They're from Spain and have a pretty good perfume. Out of season, they’re too sour.
For the chocolate base:
6 egg whites - my own Whitelees eggs are so huge that I only used 5 this morning and it worked out just fine.
300g (1 1/3 cups) sugar
3 heaping tablespoons cocoa powder, sifted
1 teaspoon balsamic or red wine vinegar
50 g of dark chocolate, finely chopped (50 g of plain chocolate chips will do if you're stuck)
For the topping:
500 ml (about a cup) whipping cream or double cream
500 grams raspberries
coarsely grated dark chocolate
Preheat your oven to 180 C or about 350 F and line a baking sheet with baking parchment or baking paper . Beat the egg whites until peaks form and then beat in the sugar a tablespoon at a time. (it will take a while – patience please) Beat until it is all soft and shiny. Sprinkle the cocoa powder and vinegar over the top and the chopped chocolate. Gently fold everything thoroughly . You don’t want to loose all the air you just spent ages getting IN.
Mound all of this onto the baking paper in a circle that is a rough 8 inches in diameter and pop it in the oven. Immediately as you put it in the oven, turn the temperature right down to just under 150 C or about 280 F and bake for one to one and a half hours. When it is finished, turn off the oven, but leave the meringue in the oven and let it cool as the oven cools. When it is ready it should be crisp around the edges and on the sides and dry on the top.

This is the finished base. It is taking all my self-control not to break it up into bits and eat it now. I could do that, but I don't have enough eggs to make another at this point. I have some eggs, but they were laid this morning and won't be ready to use for baking until tomorrow. Did you know that you can't use a really fresh egg for most baking. The eggs have to be at least a day old.
Now whip the cream (add a little vanilla extract and a smidge of sugar if you think your raspberries might be too sour.)
When you’re ready, invert the base onto a serving dish and put the whipped cream on the base. Arrange the raspberries on top of the whipped cream and garnish with the coarsely grated chocolate. You're ready to go.
BLUEBERRY MUFFINS - or Cranberry
 Preheat your oven to 180 C or 350 F. Put muffin papers in your muffin tin OR if you are out of muffin papers grease and flour the tin.
1 3/4 cups plain flour
1/3 cup sugar
2 teaspoons baking powder
1/4 teaspoon salt
1 beaten egg
3/4 cup milk
1/4 cup cooking oil
Mix all the dry ingredients together and make a little well in the centre. Into the centre pour the beaten egg, milk and oil. Only mix it a little bit. The lumpier the batter, the better the muffins will be.
It's so important I'm stating this twice. DON'T OVER MIX. The lumpier the batter, the better the muffins. I barely blend the mixture.
Now fold in the blueberries. Spoon the batter into the muffin papers and pop into the oven for about 25 minutes or until the tops are golden brown. This recipe will make 7 nice big muffins or 9 small ones. I prefer big. If you prefer the smaller muffins, cut the baking time. The photo above shows the approximate size if you only make seven.
Cranberry version
If you wish to make cranberry muffins, and a bit more sugar to the batter and replace the blueberries with a cup of cut up cranberries. I cut them in half. Cranberries are really tasty but very sour. I sprinkle a bit of granulated sugar on the tops of the muffins before baking. Makes for a crisp bit of sugar to balance out the pucker value of the cranberries. Cooked cranberries are as beautiful as rubies.
NOTE: Thanks for the comment about be not putting in the amounts of blueberries or cranberries in the above recipe. I didn't put the amounts in as I usually just use a whole container of blueberries straight from the shops. The containers aren't large in the UK and seem to have just enough for one batch of muffins. If you want actual measurements, then about a heaping cup of blueberries. Naturally, add more if you've got them or fewer if you want less blueberry goodness in the muffins. As for cranberries, a good cup of cranberry halves will do. Adjust the amounts to your own personal taste.. in other words - "some" blueberries and "some" cranberries.
Monday, May 01, 2006
Caramels
An old favourite of mine from waaaaay back. The ingredient light-coloured corn syrup is not available in the UK. I may try golden syrup which seems to be similar but thicker at some point. I'll let you know the results.
Before you start, get your pan ready. Line an 8 x 8 x 2 inch pan with a big sheet of cooking foil. Then butter the foil. You'll be glad you did this before hand because if you don't do this first, you'll have to stop stirring the candy at a crucial point and it may burn. If you want chopped walnuts or even better, pecans in the final product, sprinkle them onto the buttered, foil-lined tin.
This is not a recipe that you can do while having a glass of wine. You will be dealing with food temperatures that are a lot hotter than you would find normally. Save yourself unnecessary pain and another cooking burn by staying clear headed.
1 cup butter - please use butter and not margarine - no substitutions for this one
16 oz of light brown or muscavado sugar (about 2 1/4 packed cups)
2 cups of cream (US folks please use half and half)
1 cup light corn syrup (Karo syrup - not available in the UK)
1 teaspoon vanilla extract (which I forgot last time and it still turned out beautifully)
In your heaviest bottomed large pan melt the butter over low heat. Add in the brown sugar, cream and corn syrup. Stir in and turn the heat up a tiny bit. Clip a candy thermometer onto the side of the pan. When the mixture starts to boil, check the flame under your pan (if you're using gas - make sure that the flame is only just touching the bottom of the pan) I cannot stress enough that you can't turn up the heat to make this recipe cook any faster. Slow and steady.
Stir the boiling mass constantly while monitoring the thermometer. Keep going until the candy has reached the firm ball stage. The thermometer will register about 248 F or 120 C. You will have noticed that the texture of the mixture will have started to change. Please be careful at this point. Right at the end when the candy is at its hottest is when you run the greatest risk of burning your candy.
When it is ready, remove from the heat, stir in the vanilla and pour the caramel into the prepared baking tin. You're going to have to let it cool for hours. When it is first poured out, it is molten sugar and will give you a nasty burn. Don't touch it!
When it has cooled completely, unmould it onto a big cutting board and using your biggest knife, cut it into small cubes. Put all the cubes in an airtight container and hope that they last in your house for more than a day.
See - its empty
Before you start, get your pan ready. Line an 8 x 8 x 2 inch pan with a big sheet of cooking foil. Then butter the foil. You'll be glad you did this before hand because if you don't do this first, you'll have to stop stirring the candy at a crucial point and it may burn. If you want chopped walnuts or even better, pecans in the final product, sprinkle them onto the buttered, foil-lined tin.
This is not a recipe that you can do while having a glass of wine. You will be dealing with food temperatures that are a lot hotter than you would find normally. Save yourself unnecessary pain and another cooking burn by staying clear headed.
1 cup butter - please use butter and not margarine - no substitutions for this one
16 oz of light brown or muscavado sugar (about 2 1/4 packed cups)
2 cups of cream (US folks please use half and half)
1 cup light corn syrup (Karo syrup - not available in the UK)
1 teaspoon vanilla extract (which I forgot last time and it still turned out beautifully)
In your heaviest bottomed large pan melt the butter over low heat. Add in the brown sugar, cream and corn syrup. Stir in and turn the heat up a tiny bit. Clip a candy thermometer onto the side of the pan. When the mixture starts to boil, check the flame under your pan (if you're using gas - make sure that the flame is only just touching the bottom of the pan) I cannot stress enough that you can't turn up the heat to make this recipe cook any faster. Slow and steady.

Stir the boiling mass constantly while monitoring the thermometer. Keep going until the candy has reached the firm ball stage. The thermometer will register about 248 F or 120 C. You will have noticed that the texture of the mixture will have started to change. Please be careful at this point. Right at the end when the candy is at its hottest is when you run the greatest risk of burning your candy.
When it is ready, remove from the heat, stir in the vanilla and pour the caramel into the prepared baking tin. You're going to have to let it cool for hours. When it is first poured out, it is molten sugar and will give you a nasty burn. Don't touch it!
When it has cooled completely, unmould it onto a big cutting board and using your biggest knife, cut it into small cubes. Put all the cubes in an airtight container and hope that they last in your house for more than a day.

See - its empty
Thursday, February 09, 2006
Prize Winning Carrot Cake
This recipe has actually been entered in the Langholm Show. It sat in the home industry tent being judged while I walked around the show grounds admiring the best of the local livestock and talking to stall holders about the merits various of oil tanks. When the tent was re-opened after the judging, my cake had placed third! It turns out that I was only supposed to ice the top of the cake (why?) and I had iced the whole darned thing. Do you think my little cake would have placed better, had I known the rules for presentation?? I'll let you know next September when the Langholm Show comes around again.
Pre-heat your oven to 350 F or about 180 C
2 cups plain flour
2 cups sugar - If you think this is too much sugar, use a bit less. I do.
1 teaspoon baking powder
1 teaspoon bicarbonate of soda (baking soda)
1 teaspoon ground cinnamon
3 cups of finely shredded carrots
1 cup cooking oil
4 eggs
Cream Cheese Frosting (recipe listed below)
Grease and lightly flour two cake tins or pans and set them aside (for years I only had one cake pan so I had to bake the cake batter in two goes)
In a large mixing bowl, blend the flour, sugar, baking powder, bicarbonate of soda and cinnamon. Then add the carrots, oil and eggs. Beat with an electric mixe until all is combined. Be careful as some of the flour will hide in the bottom of your mixing bowl. You'll only find this unblended flour as you are pouring the cake mix into the pans.
Divide the cake mix into your cake tins and pop them into the oven. Bake them for about 35 to 40 minutes. Keep an eye on them. If they're starting to brown on the top, they're done.
Remove the cakes from their tins onto wire racks and let them cool completely. While they're cooling you can tackle the frosting.
3 oz cream cheese, softened
1/2 cup unsalted butter or margarine, softened
2 teaspoons vanilla extract
4 1/2 cups of powdered sugar or confectioners sugar
In a mixing bowl and an electric mixer, blend the cream cheese and butter together. Add in the vanilla and mix until light and fluffy. Gradually sift in 2 cups of the powdered sugar, beating well. Then keep sifting in the rest of the powdered sugar while beating until you've reached spreading consistency.
Now you can frost your cake.

Monday, February 06, 2006
Mediterranean Vegetable Pasties
This is a great recipe if you've got vegetarians coming over for dinner. I checked the label on the puff pastry I buy for this and it is made from vegetable fat so this recipe is fine for those difficult to cook for vegans as well. You do have to purchase one odd item, capers. Its the sort of odd item you get for one recipe and then don't use again for ages. Thankfully they'll keep for a long time. I make this recipe so often, that capers have been upgraded from weird one-off item that is purchased for a single recipe to item that I actually run out of. I have to make sure that I have some in before starting because it is the sort of thing my neighbours will never have in for me to borrow.
Pre heat your oven to 180 C or 350 F - a medium oven
Ingredients:
2 small courgettes or zucchini, washed and sliced
2 bell peppers, diced (I use two different colours for prettiness)
1 aubergine or eggplant, diced
1 British tablespoon or 2 US tablespoons of minced capers
1/2 teaspoon of dried oregano (more or less to taste)
two blocks of ready-to-use puff pastry
Saute all the vegetables in a little olive oil until they begin to be soft - 15 to 20 minutes. Season with oregano, salt and pepper and turn the heat off and let cool on the back of the stove while you get the pastry ready.
Roll out the puff pastry on a clean, lightly floured surface. Cut large circles, about the size of a tea cup saucer. Make certain you have an even number of circles - one for the top and one for the base. If you find it quicker, you can just cut the pastry into rectangles.
Lay your puff pastry bases out onto baking sheets or trays. Place a small mound of the cooked vegetables in the centre of each base. Ensure that the vegetable filling doesn't touch the edges, but if it does, don't freak out, just push it back. Lay the top puff pastry shape over the top and press the edges with the tines of a fork. They are now ready for the oven.
You can embellish a bit here and give the pasties a light brush of beaten egg (don't use an egg if there are vegans about) or brush with some water and a sprinkle with some sesame seeds.
Bake these in the oven for about 40 minutes OR until the pastry is puffed up and light brown. Please use your common sense with the baking times. No two ovens have the same cooking times. My oven runs a little hot and I have to compensate by keeping the thermostat a bit lower than is normal. Just make certain the puff pastry isn't too pale or too brown and you can't go wrong.
Serve hot. Please be careful when serving them, especially serving them straight out of the oven. The middles will be very steamy and might burn.
Winter Vegetable Cobbler
Having vegetarians for dinner? Don't panic.
I actually married a vegetarian. When we first got married I had about five things I could cook for dinner that didn't include meat. Most of these things were pasta dishes with the meat left out.
This is a great one and can be modified if your dinner guests are vegan by leaving out the cheese and changing normal milk for soy milk.
1 small swede - (rutabaga if you're from the US)
2 parsnips
2 leeks
2 carrots
broccoli bunch - broken up into florettes
1 cup of whole cranberries - fresh or frozen (I almost always forget to add these and nobody misses them)
1.5 litres vegetable stock - you can make this up from vegetable stock cubes
1/4 teaspoon of all spice - very important!
butter or margarine
plain flour
Peel and dice the swede and parsnips.
Peel and slice the carrots and leeks.
In a large stock pot, make a roux out of approximately 2 oz of margarine and 3 tablespoons of plain flour. (The thing is, I never measure when I'm not baking so a lot of this recipe I've had to go back and measure out or weigh the amounts that I normally put into this recipe.) Cook the roux for 2 minutes but don't let it brown. Beat in the vegetable stock until it has all been added and add in the all spice. You've now got a pretty good runny gravy. Leaving the broccoli to one side (you'll need that for later), place the prepared vegetables into this vegetable gravy. Cover the stock pot and let it simmer away on LOW heat while you prepare the scones. Don't forget to stir this from time to time so that it doesn't stick and burn. (I let this happen once, but it wasn't badly burned and was salvagable)
The Cheese Scone or baking powder biscuit topping.
8 oz or 2 cups plain flour
2 big teaspoons baking powder
1/4 teaspoon salt
2 oz or 1/2 cup grated sharp cheddar
5 oz or 1/2 cup margarine
5 oz or 2/3 cup milk (soy milk for vegans)
Mix the flour, salt, baking powder in a bowl, add in the margarine and blend together until you have it looking like breadcrumbs. Add in the grated cheese and the milk. Make a dough that is not too soft to roll out. If it has become too sticky, just carefully add a bit more flour. Don't worry about the lumps of cheese. Roll out the dough and cut out the round scone or biscuit shapes.
Place the broccoli florettes in a pan of boiling water for half a minute to blanche them. They'll look funny when you bake them otherwise. Then drain the broccoli.
Now go back to your vegetables that have been simmering away and remove the pot from the heat. Please be careful with the next step because it's hot.
Dump it all into a very large casserole dish and arrange the uncooked scone shapes on top of it all. Place the broccoli florettes between the scone shapes, stem side down. You can choose to grate a bit more cheese over the top at this point if you desire.
Pop this into a medium oven (approximately 180 C or 350 F) for about 40 minutes or so. The scones will have risen and become golden brown.
Remove from the oven, let it set for a few minutes to cool down and then serve!
Friday, February 03, 2006
Tiramisu! Ricetta della mia nonna
This is the first recipe in this section of my blog. You will find a mixture of US, UK and Metric measurements. Please forgive this. Some things require entire tubs of things and if they are sold in the UK, then they're sold in metric weights and measures. I have loads of US measuring things in my kitchen as I am an American. Because I have been living in the UK now since 1992, I have started using their weights and measures. I may try to include more than one equivalent measure when I have it, but if I don't, you're just going to have to muddle along yourself. I'm not a great one for measuring, I mostly approximate. Thankfully eggs is eggs and they don't need conversion.
My husband Henry works with a woman of Italian descent. The following is this woman's grandmother's recipe.
It is so gorgeous. Tasting this proper Italian desert is like being kissed by one of Botiicelli's angels. It is especially nice to serve as your "show off" desert for dinner guests. But with all things that you serve to guests, make sure you have prepared it for your family at least once before - if not to make sure that they will like it, it also helps to work out any adjustments you may want to make.
Tiramisu
2 eggs
25o grams Marscapone (10oz UK)
284 ml double cream (10fl oz UK)
3 British Tablespoons sugar
Vino Santo OR Marsala OR Tia Maria
Very strong coffee
lady fingers or sponge fingers or trifle sponges - smaller are better - enough to cover the bottom of . . . .
a nice big rectangular serving dish
chocolate powder to sprinkle on top
Separate the eggs. Beat the egg whites until stiff and set aside
In another bowl whip the cream. Make sure it itsn't whipped too stiffly.
In yet another bowl, add the sugar to the egg yolks and whip them until it looks pale yellow and a bit thickened.
Add in the marscapone to the egg yolks and sugar and mix it until all the lumps of marscapone have dissolved. Then mix in the partially beaten double cream.
At this point blend in 2 big tablespoons of Vino Santo. Lastly fold in the beaten egg whites.
Set all this fluffy loveliness to one side and concentrate on the bottom layer.
Get yourself that strong coffee. If using espresso, so much the better. If you're using ordinary filter coffee, go ahead and stick a teaspoon of instant coffee in it to give it a better kick. You'll need to have about 2 good cups (if you're using the thicker trifle sponge cakes, you'll need more coffee/booze mixture because they soak up more liquid) and add about 60 ml (1/4 cup) of Vino Santo or whatever you're using. You'll use this to dip your sponge fingers in. I find that if I soak them well, they fall apart in the handling, so dip quickly and get them into the bottom of your serving dish and then drip a bit more mixture onto them when they are in place. Please enure that the sponge fingers or trifle sponges are completely sodden, they can be oozing a bit. Then spoon on your fluffy layer. If you're feeling fruity and you have enough stuff, you can make a second layer. When you have finished building this desert, sprinkle it with the chocolate powder. You're done!
I am assured that this desert is better served the day after it is made, but I have never been able to wait that long. The longest I could be asked to wait was 4 hours in the fridge. Frankly, I think I deserve some sort of willpower medal for that. The other thing about this desert is that kids usually don't like coffee or the taste of alcohol in a desert and might not even want any AND if there is any left over, it will be untouched in the fridge until you can get at it.
Subscribe to:
Posts (Atom)